背景
你在一个教室中趴在桌子上睡觉,天色开始逐渐变红,教室中的窗帘被一阵风拍的开始乱飞,你被惊醒,发现同学都不见了,你跑出教室,下楼的时候你突然脚滑摔晕。
等你醒来的时候已经晚上,周围的环境让你感到陌生,“有人吗?你好?!”,并没有得到回复。
你看向唯一发光的物体,是一台笔记本,上面写着你必须实现一个路径追踪渲染器,否则你将一直被关在这个纯黑的密室中,没有时间限制,我们提供了必要的文件,最后需要渲染出一个标准的CornellBox场景,没有性能要求,并发送到邮箱cglab@cglab.top,你发现这台电脑并不能连接网络,“岂可休!”。
你身为一个计算机系的学生,你对计算机图形学一窍不通只知道计算机图形学是门研究渲染,动画,模拟,几何等等的一门学科,但是你学过C++,cmake,概率论基础,线性代数基础,微积分基础,并且你懂得如何构建让C++代码成功编译并运行。
你打开了提供的README.md:
README
你好啊。当你看到这个文件的时候,说明你已经被邀请加入CGLab了。
你可能会问:为什么是我?
这个我们也不知道,我们加入CGLab的原因我们自己也没有搞明白,我们至今只知道拥有图形学潜力的人会被邀请加入CGLab。
每个被 xxx 邀请加入CGLab的人都会和你一样突然进入这个神秘的空间,并且每个人进入这个空间都会被分配一个任务,每个人的任务都是不一样的这次你被分配的任务是实现一个路径追踪渲染器。
如果这个任务没有完成你会永远被关在这个密室中,自生自灭。
但如果你完成了任务你将会得到对应的 “加护”,你被分配的是渲染领域的任务,xxx 认为你在渲染领域非常有潜力。
不过不用担心,我们会在这个README中逐步教你实现一个Path Tracing Renderer。让我们开始吧!!
PPM
在计算机图形学渲染领域学习的时候我们通常需要渲染一张图片或者多张图片所组成一个连续的动画,在这里我们只需要渲染一张图片,我们都知道图片是由一系列像素组成的,我们可以吧像素理解为一个小方块,每个小方块都有自己的颜色属性,由许多不同颜色的像素就可以组成一张图片。
这就需要我们使用程序将数据写入一张图片中,但是通常我们使用的 png,jpg 等图片格式并不适合我们进行学习,所以我们这里使用一种格式为 ppm 的图片格式,这种图片格式是一种文本图片格式, 它是由一系列字符串表示的。
ppm 文件有两种数据格式,一种是 ASCII 格式,一种是 BINARY 格式。我们将使用第一种格式,这种格式下我们可以轻松的知道每个像素是什么颜色。
举个例子
假设我们要创建一个 $2 \times 2$ 像素的微型图片,包含红、绿、蓝和黄四种颜色。它的文件内容看起来是这样的:
1P3
22 2
3255
4255 0 0
50 255 0
60 0 255
7255 255 0
- P3: 告诉解析器这是ASCII格式PPM文件
- 2 2: 宽 2 像素,高 2 像素,定义图片的大小
- 255: 颜色范围从 0 到 255,图形学中我们通常使用一个三维向量表示颜色,这个向量中的三个分量分别表示红、绿、蓝的权重。如果如果学过美术的应该很容易懂就类似美术中的红黄蓝可以调配出大部分颜色
- 后面的就是颜色值,通常我们每行一个颜色值
所以我们第一步就是写一个写PPM文件的程序,在图形学中底层中我们通常选择C++进行编写程序
 1// 身为被选中的你,应该不需要我门对这段简单的C++代码做出解释了
 2#include <filesystem>
 3#include <fstream>
 4#include <iostream>
 5#include <vector>
 6
 7struct Color {
 8    int r, g, b;
 9};
10
11void writePPM(const std::filesystem::path& path, int width, int height, const std::vector<Color>& data)
12{
13    std::ofstream ofs(path);
14
15    ofs << "P3\n" << width << " " << height << "\n255\n";
16
17    for (int i = 0; i < width * height; ++i) {
18        int r = data[i].r;
19        int g = data[i].g;
20        int b = data[i].b;
21
22        ofs << r << " " << g << " " << b << "\n";
23    }
24
25    ofs.close();
26}
我们可以测试 writePPM 渲染一个简单的图,我们让图片中的像素的2维坐标 $(u,v)$ 作为图片的颜色 $(u,v,0)$
 1int main()
 2{
 3    int width = 100;
 4    int height = 100;
 5    std::vector<Color> data(width * height);
 6
 7    for (int i = 0; i < height; ++i) {
 8        for (int j = 0; j < width; ++j) {
 9            data[i * width + j] = {i, j, 0};
10        }
11    }
12
13    writePPM("out.ppm", width, height, data);
14
15    return 0;
16}
渲染出来的结果是

Path Tracing
好了我们已经拥有渲染图片的能力了,让我们正式开始学习Path Tracing的概念,在Path Tracing中我们使用的是几何光学,我们假设光线从我们的眼睛(或者叫Camera)出发经过视口(我们最终渲染出来的图)后在场景中经过一系列弹射最后打到光源的这么一个过程。
我们可以这么理解,我们通过数学的方式定义了一个在抽象空间的场景,我们想通过我们的眼睛在电脑的显示器上看到这个场景,我们需要通过渲染器才能有办法看到这个场景,这个渲染器会模拟我们的行为,渲染器中会定义我们的眼睛(Camera),我们想以什么角度看这个场景,以及我们的眼睛(Camera)的参数也可以调整,然后定义我们的眼睛最终看到的图片的大小,也就是可视范围,然后模拟光线的弹射,根据光线的弹射将场景中的信息写入可视范围中最后保存为一张图片。
这其中有很多我们需要解决的问题
- 为什么光线是从相机出发不是从光源出发
- 光线是怎么从相机打出去的
- 光线怎么知道与物体作用了
- 光线与物体作用了之后怎么弹射
- 光线怎么知道打到了光源
- 怎么让渲染的结果与真实物理世界一致
我们先回答这些问题
1. 为什么光线是从相机出发而不是从光源出发
从光源出发向四面八方发射数百万条光线。其中大部分光线会撞到墙角、地板或天花板,经过多次反弹后能量耗尽,永远无法进入你的瞳孔。对于计算机来说,计算这些光线完全是浪费资源。
而从相机出发我们只需要处理那些“注定”会影响屏幕像素的光线。每一条从相机射出的射线,只要撞击到物体,就必然对应着屏幕上的一个点。
2. 光线是怎么从相机打出去的
我们先定义我们使用的坐标系,我们使用的坐标系是这样的:
我们以标准坐姿面向显示器正面,原点位于你显示器正中心,z轴垂直于显示器向外(也就是指向你),y轴与你显示器垂直方向平行向上,x轴与显示器水平方向平行向右。
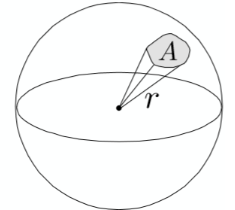
我们可以在抽象空间中定义一个点表示我们的相机的位置,我们假设相机的向上方向永远是与y轴正方向一致,并且位于(1,0,0)看向原点,视口是我们最终渲染的图片,或者说是我们的屏幕。
我们还需要了解屏幕空间和像素空间
- 屏幕空间是一个2维空间,定义原点在左上角,x轴向右,y轴向下。假设你的屏幕的宽度是1920,高度是1080,那么屏幕空间就是(0,0)到(1920,1080)。
- 像素空间是离散的网格系统
像素空间与屏幕空间的映射关系是:像素空间中的点$(x,y)$对应屏幕空间中的点$(x+0.5,y+0.5)$,屏幕空间中的点$(x,y)$对应像素空间中的点$(\left \lfloor x\right \rfloor ,\left \lfloor y\right \rfloor )$ 我们在抽象空间中从相机点出发与像素空间中的点进行连线,这就构成了一个射线或者称作向量,我们遍历像素空间中所有的点即可渲染出我们所需的可视图了
3. 光线怎么知道与物体作用了
我们需要定义光线的方程,然后通过解析的方式判断这个方程在某些几何体表面上是否有解,如果有解则说明相交了,回想一下我们怎么计算两个直线的交点你就明白了
4. 光线与物体作用了之后怎么弹射
我们需要定义物体的材质,材质决定了光线在这个物体作用后怎么弹射
5. 光线怎么知道打到了光源
我们让光线在场景中不断的弹射,再定义哪些物体是光源,每次光线与改物体相交之后询问一下你是光源吗
6. 怎么让渲染的结果与真实物理世界一致
我们需要使用物理的方式去渲染一张图,而不是随便定义
在开始实现其他的代码之前我们提供一个Vec3向量运算头文件给你
  1#pragma once
  2
  3#include <cmath>
  4#include <cstddef>
  5
  6#include <array>
  7#include <iostream>
  8
  9class Vec3 {
 10public:
 11    constexpr Vec3() noexcept = default;
 12
 13    constexpr Vec3(double x, double y, double z) noexcept
 14        : elements_{x, y, z}
 15    {}
 16
 17    [[nodiscard]] constexpr double x() const noexcept
 18    {
 19        return elements_[0];
 20    }
 21
 22    [[nodiscard]] constexpr double y() const noexcept
 23    {
 24        return elements_[1];
 25    }
 26
 27    [[nodiscard]] constexpr double z() const noexcept
 28    {
 29        return elements_[2];
 30    }
 31
 32    [[nodiscard]] constexpr Vec3 operator-() const noexcept
 33    {
 34        return Vec3{-elements_[0], -elements_[1], -elements_[2]};
 35    }
 36
 37    [[nodiscard]] constexpr double operator[](std::size_t index) const noexcept
 38    {
 39        return elements_[index];
 40    }
 41
 42    constexpr double& operator[](std::size_t index) noexcept
 43    {
 44        return elements_[index];
 45    }
 46
 47    constexpr Vec3& operator+=(const Vec3& other) noexcept
 48    {
 49        elements_[0] += other.elements_[0];
 50        elements_[1] += other.elements_[1];
 51        elements_[2] += other.elements_[2];
 52        return *this;
 53    }
 54
 55    constexpr Vec3& operator*=(double scalar) noexcept
 56    {
 57        elements_[0] *= scalar;
 58        elements_[1] *= scalar;
 59        elements_[2] *= scalar;
 60        return *this;
 61    }
 62
 63    constexpr Vec3& operator/=(double scalar) noexcept
 64    {
 65        return *this *= 1.0 / scalar;
 66    }
 67
 68    [[nodiscard]] double length() const noexcept
 69    {
 70        return std::sqrt(lengthSquared());
 71    }
 72
 73    [[nodiscard]] constexpr double lengthSquared() const noexcept
 74    {
 75        return elements_[0] * elements_[0] + elements_[1] * elements_[1] + elements_[2] * elements_[2];
 76    }
 77
 78    [[nodiscard]] bool nearZero() const noexcept
 79    {
 80        constexpr auto threshold = 1e-8;
 81        return std::abs(elements_[0]) < threshold && std::abs(elements_[1]) < threshold &&
 82               std::abs(elements_[2]) < threshold;
 83    }
 84
 85private:
 86    std::array<double, 3> elements_{};
 87};
 88
 89inline std::ostream& operator<<(std::ostream& out, const Vec3& v)
 90{
 91    return out << v.x() << ' ' << v.y() << ' ' << v.z();
 92}
 93
 94[[nodiscard]] constexpr Vec3 operator+(const Vec3& lhs, const Vec3& rhs) noexcept
 95{
 96    return Vec3{lhs.x() + rhs.x(), lhs.y() + rhs.y(), lhs.z() + rhs.z()};
 97}
 98
 99[[nodiscard]] constexpr Vec3 operator-(const Vec3& lhs, const Vec3& rhs) noexcept
100{
101    return Vec3{lhs.x() - rhs.x(), lhs.y() - rhs.y(), lhs.z() - rhs.z()};
102}
103
104[[nodiscard]] constexpr Vec3 operator*(const Vec3& lhs, const Vec3& rhs) noexcept
105{
106    return Vec3{lhs.x() * rhs.x(), lhs.y() * rhs.y(), lhs.z() * rhs.z()};
107}
108
109[[nodiscard]] constexpr Vec3 operator*(double scalar, const Vec3& v) noexcept
110{
111    return Vec3{scalar * v.x(), scalar * v.y(), scalar * v.z()};
112}
113
114[[nodiscard]] constexpr Vec3 operator*(const Vec3& v, double scalar) noexcept
115{
116    return scalar * v;
117}
118
119[[nodiscard]] constexpr Vec3 operator/(const Vec3& v, double scalar) noexcept
120{
121    return (1.0 / scalar) * v;
122}
123
124[[nodiscard]] constexpr double dot(const Vec3& lhs, const Vec3& rhs) noexcept
125{
126    return lhs.x() * rhs.x() + lhs.y() * rhs.y() + lhs.z() * rhs.z();
127}
128
129[[nodiscard]] constexpr Vec3 cross(const Vec3& lhs, const Vec3& rhs) noexcept
130{
131    return Vec3{
132        lhs.y() * rhs.z() - lhs.z() * rhs.y(),
133        lhs.z() * rhs.x() - lhs.x() * rhs.z(),
134        lhs.x() * rhs.y() - lhs.y() * rhs.x(),
135    };
136}
137
138[[nodiscard]] inline Vec3 unitVector(const Vec3& v)
139{
140    return v / v.length();
141}
光线
我们先定义一下光线,光线在图形学中我们定义为:
$$\mathbf{r}(t) = \mathbf{o} + t\mathbf{d} \quad 0\le t < \infty$$其中
- $\mathbf{o}$ 表示光线的起点
- $\mathbf{d}$ 表示光线的方向是一个单位向量,后续只要提到方向都是单位向量
- $t$ 表示光线的步进,可以这样想象,我们的光线从点 $\mathbf{o}$ 出发,沿着 $\mathbf{d}$ 方向走过时间 $t$ 到达的位置 所以我们可这写出这样的代码
 1#pragma once
 2#include "Vec3.h"
 3
 4class Ray {
 5public:
 6    Ray(const Vec3& origin, const Vec3& direction, double t = 0.0)
 7        : origin_(origin),
 8          direction_(direction),
 9          t_(t)
10    {}
11
12    Vec3 getOrigin() const
13    {
14        return origin_;
15    }
16
17    Vec3 getDirection() const
18    {
19        return direction_;
20    }
21
22    Vec3 operator()(double t) const
23    {
24        return origin_ + direction_ * t;
25    }
26
27private:
28    Vec3 origin_;
29    Vec3 direction_;
30    double t_;
31};
相机
我们再定义一下相机,相机定义了我们以什么角度什么位置看向场景,所以它应该有以下属性
- Position 相机的位置
- Traget 相机看向哪个位置
- Up 相机的向上方向,就像我们让一个向量从我们的大脑中心指向我们头顶的最高点一样,这个方向决定了相机的是怎么以z为轴旋转的(翻滚角),就像你用手机拍照可以竖着拍,也可以横着拍
- Vertical Fov 垂直可视范围,定义了我们在垂直方向上能看到多少内容,就像我们的眼睛一样,我们看到的东西的范围是有限的,我们没办法看到我们头顶上的东西
除此之外我们还需要存放图片信息
- Image Width 像素空间的宽度
- Image Height 像素空间的高度
- Aspect Ratio 宽高比,保留计算结果,后续多次使用
- Frame Buffer 像素空间,存放我们渲染的结果
除此之外我们还需要预计算图片上的像素是怎么偏移的,这个偏移值不一定是1,因为我们的fov会影响图片的偏移量,为什么会被多次使用?因为我们上面提到过,我们会遍历像素空间多次获取光线
- Pixel Left Top 左上角第一个像素(0,0)的中心点空间坐标,保留计算结果,后续多次使用
- Pixel DeltaU 水平方向移动一个像素的向量差,保留计算结果,后续多次使用
- Pixel DeltaV 垂直方向移动一个像素的向量差,保留计算结果,后续多次使用
我们需要从相机中发射出一条光线所以它应该需要一个获得光线的方法
获取光线很简单,获取一个像素点的位置,用像素点的位置减去相机原点位置就得到了一根光线。
所以最重要的问题是怎么获取一个像素点的位置
我们需要通过相机的除了我们需要计算的属性计算出 Pixel Left Top 、Pixel DeltaU 、Pixel DeltaV
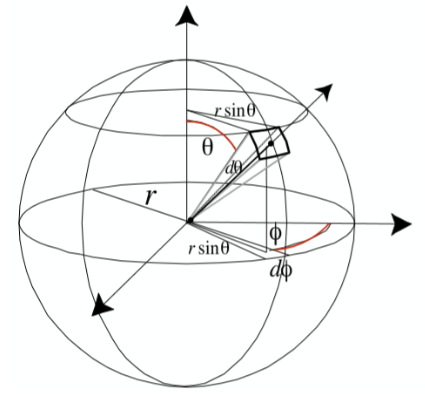
vertical_fov_ 的定义:一个平面与经过了相机点,并且垂直于视口,这个平面会与视口平面相交,交线与相机点会形成一个三角形,在这个三角形中相机点这个这个顶点的角度就是Vertical Fov
我们假设我们的相机的焦距(相机与视口之间的距离)始终是1。
下面的图片解释了如何计算
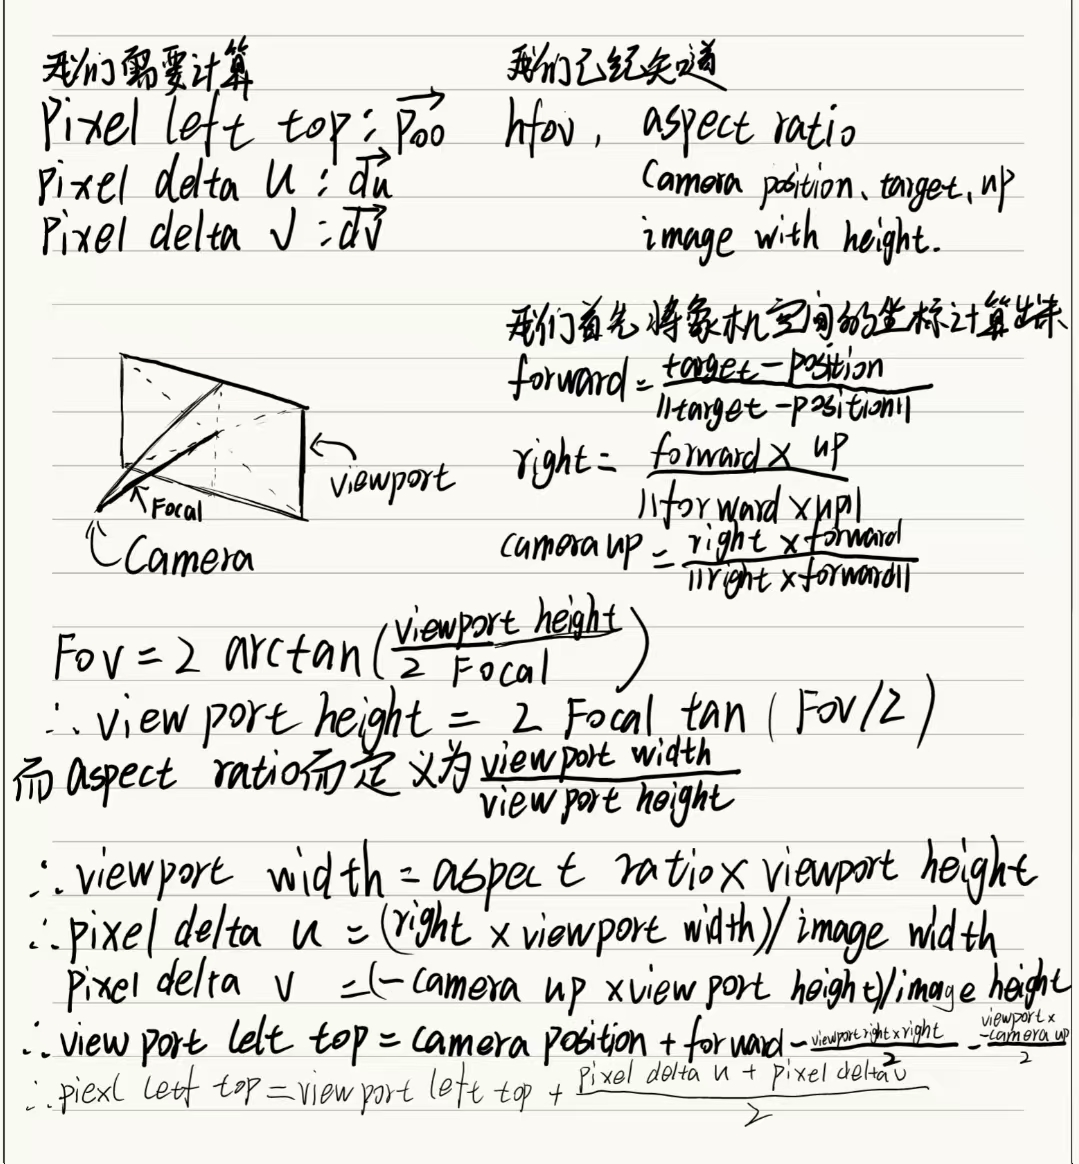
使用代码实现
 1void initCamera()
 2{
 3    Vec3 forward = unitVector(target_ - position_);
 4    Vec3 right = unitVector(cross(forward, up_));
 5    Vec3 camera_up = unitVector(cross(right, forward));
 6
 7    double theta = vertical_fov_ * 3.141592653589793 / 180.0;
 8    double viewport_height = 2.0 * std::tan(theta / 2.0);
 9    double viewport_width = aspect_ratio_ * viewport_height;
10
11    Vec3 viewport_u = right * viewport_width;
12    Vec3 viewport_v = camera_up * (-viewport_height);
13
14    pixel_delta_u_ = viewport_u / image_width_;
15    pixel_delta_v_ = viewport_v / image_height_;
16
17    Vec3 viewport_left_top_ = position_ + forward - (viewport_u / 2.0) - (viewport_v / 2.0);
18
19    pixel_left_top_ = viewport_left_top_ + 0.5 * (pixel_delta_u_ + pixel_delta_v_);
20}
现在我们能够获取像素空间中任意像素的位置了,通过pixel_left_top_,pixel_delta_u_和pixel_delta_v_
1Ray getRay(int i, int j) const
2{
3    Vec3 pixel_center = pixel_left_top_ + (i * pixel_delta_u_) + (j * pixel_delta_v_);
4    Vec3 ray_direction = unitVector(pixel_center - position_);
5    return Ray{position_, ray_direction};
6}
最终我们的相机长这样
 1#pragma once
 2#include "Ray.h"
 3#include "Vec3.h"
 4
 5#include <cmath>
 6
 7#include <vector>
 8
 9class Camera {
10public:
11    Camera(int image_width, int image_height)
12        : position_(Vec3(278, 273, -800)),
13          target_(Vec3(0, 0, 0)),
14          up_(Vec3(0, 1, 0)),
15          vertical_fov_(90),
16          image_width_(image_width),
17          image_height_(image_height),
18          aspect_ratio_(static_cast<double>(image_width) / image_height),
19          frame_buffer_(image_width * image_height)
20    {
21        initCamera();
22    }
23
24    int getImageWidth() const
25    {
26        return image_width_;
27    }
28
29    int getImageHeight() const
30    {
31        return image_height_;
32    }
33
34    std::vector<Vec3>& getFrameBuffer()
35    {
36        return frame_buffer_;
37    }
38
39    const std::vector<Vec3>& getFrameBuffer() const
40    {
41        return frame_buffer_;
42    }
43
44    Ray getRay(int i, int j) const
45    {
46        Vec3 pixel_center = pixel_left_top_ + (i * pixel_delta_u_) + (j * pixel_delta_v_);
47        Vec3 ray_direction = unitVector(pixel_center - position_);
48        return Ray{position_, ray_direction};
49    }
50
51private:
52    Vec3 position_;
53    Vec3 target_;
54    Vec3 up_;
55    double vertical_fov_;
56    int image_width_;
57    int image_height_;
58    double aspect_ratio_;
59    std::vector<Vec3> frame_buffer_;
60
61    Vec3 pixel_left_top_;
62    Vec3 pixel_delta_u_;
63    Vec3 pixel_delta_v_;
64
65    void initCamera()
66    {
67        Vec3 forward = unitVector(target_ - position_);
68        Vec3 right = unitVector(cross(forward, up_));
69        Vec3 camera_up = unitVector(cross(right, forward));
70
71        double theta = vertical_fov_ * 3.141592653589793 / 180.0;
72        double viewport_height = 2.0 * std::tan(theta / 2.0);
73        double viewport_width = aspect_ratio_ * viewport_height;
74
75        Vec3 viewport_u = right * viewport_width;
76        Vec3 viewport_v = camera_up * (-viewport_height);
77
78        pixel_delta_u_ = viewport_u / image_width_;
79        pixel_delta_v_ = viewport_v / image_height_;
80
81        Vec3 viewport_left_top_ = position_ + forward - (viewport_u / 2.0) - (viewport_v / 2.0);
82
83        pixel_left_top_ = viewport_left_top_ + 0.5 * (pixel_delta_u_ + pixel_delta_v_);
84    }
85};
光源与物体求交
相机和光线我们解决了,接下来我们解决光线如何与物体作用中的光线如何判断与物体相交
光线与球体求交
我们首先看看光线如何与球体求交 我们知道光线的方程是
$$\mathbf{r}(t) = \mathbf{o} + t\mathbf{d} \quad 0\le t < \infty$$球体的方程是
$$\mathbf{p}:(\mathbf{p}-\mathbf{c})^2 -R^2 = 0$$我们令
$$\mathbf{r}(t) =\mathbf{p}$$有
$$(\mathbf{o} + t\mathbf{d}-\mathbf{c})^2 -R^2 = 0$$方程中 $\mathbf{o}$ 、$\mathbf{d}$、$\mathbf{c}$都是向量和$R$是已知的,展开我们得到
$$\mathbf{d}\cdot\mathbf{d}t^2+2(\mathbf{o}-\mathbf{c})\cdot\mathbf{d}t+(\mathbf{o}-\mathbf{c})\cdot(\mathbf{o}-\mathbf{c})-R^2=0$$可以看到向量之间都变为了点乘运算,最后算出来的是t是一个标量,这也符合这个方程,而且这是一个二次方程,所以我们可以直接使用求根公式 我们令
- $a = \mathbf{d}\cdot\mathbf{d}$
- $b = 2(\mathbf{o}-\mathbf{c})\cdot\mathbf{d}$
- $c = (\mathbf{o}-\mathbf{c})\cdot(\mathbf{o}-\mathbf{c})-R^2$ 使用求根公式 $$t = \frac{-b \pm \sqrt{b^2 - 4ac}}{2a}$$我们取 t>0 的就行 使用代码实现,我们首先需要实现一个 Object 基类表示我们所有可以被光线击中的物体,其次我们需要记录我们的交点的信息,比如交点的坐标,是否相交,交点的材质(后续添加)等等
 1#pragma once
 2#include "Ray.h"
 3#include "Vec3.h"
 4
 5#include <optional>
 6
 7struct InterInfo {
 8    bool is_Intersected = false;
 9    Vec3 position;
10};
11
12class Object {
13    Object() = default;
14    virtual ~Object() = default;
15    virtual bool intersect(const Ray& ray) const = 0;
16
17    virtual InterInfo getInterInfo(const Ray& ray) const = 0;
18
19protected:
20    InterInfo inter_info_;
21};
我们再实现一个Sphere子类,通过我们上面的公式可以实现
 1#include "Object.h"
 2
 3class Sphere final : public Object {
 4public:
 5    Sphere(const Vec3& center, double radius)
 6        : center_(center),
 7          radius_(radius)
 8    {}
 9
10    ~Sphere() noexcept override = default;
11
12    // 使用 b^2 - 4ac > 0 来判断是否有实根,如果有实根则说明与球相交
13    bool intersect(const Ray& ray) const override
14    {
15        Vec3 oc = ray.getOrigin() - center_;
16        double a = dot(ray.getDirection(), ray.getDirection());
17        double b = 2.0 * dot(oc, ray.getDirection());
18        double c = dot(oc, oc) - radius_ * radius_;
19        double discriminant = b * b - 4 * a * c;
20        return discriminant > 0;
21    }
22
23    InterInfo getInterInfo(const Ray& ray) const override
24    {
25        Vec3 oc = ray.getOrigin() - center_;
26        double a = dot(ray.getDirection(), ray.getDirection());
27        double b = 2.0 * dot(oc, ray.getDirection());
28        double c = dot(oc, oc) - radius_ * radius_;
29        double discriminant = b * b - 4 * a * c;
30
31        if (discriminant > 0) {
32            double sqrt_disc = std::sqrt(discriminant);
33            double t1 = (-b - sqrt_disc) / (2.0 * a);
34            double t2 = (-b + sqrt_disc) / (2.0 * a);
35
36            double t = t1 < t2 ? t1 : t2; // 选择较小的正根
37            if(t > 1e-8){
38                Vec3 hit_position = ray(t);
39                return InterInfo{true, hit_position};
40            }
41        }
42
43        return InterInfo{false, Vec3()};
44    }
45
46private:
47    Vec3 center_;
48    double radius_;
49};
我们再定义一个场景类,用于存放我们场景中存在的东西
 1#pragma once
 2#include "Camera.h"
 3#include "Object.h"
 4#include "Sphere.h"
 5#include "Vec3.h"
 6
 7#include <memory>
 8#include <vector>
 9
10class Scene {
11
12public:
13    Scene(Camera camera)
14        : camera_(camera)
15    {}
16
17    ~Scene() = default;
18
19    void addObject(std::unique_ptr<Object> object)
20    {
21        objects_.push_back(std::move(object));
22    }
23
24    void addSphere(const Vec3& center, double radius)
25    {
26        addObject(std::make_unique<Sphere>(center, radius));
27    }
28
29    void clearObjects()
30    {
31        objects_.clear();
32    }
33
34    Camera& getCamera()
35    {
36        return camera_;
37    }
38
39    const Camera& getCamera() const
40    {
41        return camera_;
42    }
43
44    const std::vector<std::unique_ptr<Object>>& getObjects() const
45    {
46        return objects_;
47    }
48
49private:
50    Camera camera_;
51    std::vector<std::unique_ptr<Object>> objects_;
52};
我们再定义一个渲染器用于渲染我们最终的图
 1#include "Camera.h"
 2#include "Ray.h"
 3#include "Scene.h"
 4#pragma once
 5
 6class Renderer {
 7public:
 8    Renderer() = default;
 9    ~Renderer() = default;
10
11    void render(Camera& camera, const std::vector<std::unique_ptr<Object>>& objects)
12    {
13        for (int j = 0; j < camera.getImageHeight(); ++j) {
14            for (int i = 0; i < camera.getImageWidth(); ++i) {
15                Ray ray = camera.getRay(i, j);
16                Vec3 pixel_color = traceRay(ray, objects);
17                camera.getFrameBuffer()[j * camera.getImageWidth() + i] = pixel_color;
18            }
19        }
20    }
21
22private:
23    Vec3 traceRay(const Ray& ray, const std::vector<std::unique_ptr<Object>>& objects)
24    {
25        for (const auto& object : objects) {
26            if (object->intersect(ray)) {
27                // 如果击中物体则显示红色
28                return Vec3(255.0, 0.0, 0.0);
29            }
30        }
31        // 否则显示黑色
32        return Vec3(0.0, 0.0, 0.0);
33    }
34};
最后我们修改mian.cpp
 1#include "Camera.h"
 2#include "Object.h"
 3#include "Renderer.h"
 4#include "Scene.h"
 5#include "Vec3.h"
 6
 7#include <filesystem>
 8#include <fstream>
 9#include <iostream>
10#include <memory>
11#include <vector>
12
13void writePPM(const std::filesystem::path& path, int width, int height, const std::vector<Vec3>& data)
14{
15    std::ofstream ofs(path);
16
17    ofs << "P3\n" << width << " " << height << "\n255\n";
18
19    for (int i = 0; i < width * height; ++i) {
20        int r = data[i].x();
21        int g = data[i].y();
22        int b = data[i].z();
23
24        ofs << r << " " << g << " " << b << "\n";
25    }
26
27    ofs.close();
28}
29
30int main()
31{
32    int width = 600;
33    int height = 600;
34    Camera camera(width, height);
35
36    std::unique_ptr<Object> sphere1 = std::make_unique<Sphere>(Vec3(0, 0, 0), 600);
37    Scene scene(camera);
38    scene.addObject(std::move(sphere1));
39
40    Renderer renderer;
41    renderer.render(scene.getCamera(), scene.getObjects());
42    renderer.render(camera, scene.getObjects());
43
44    writePPM("out.ppm", width, height, camera.getFrameBuffer());
45
46    return 0;
47}
最后我们能渲染出来这个图,跟着代码的思路来有一些C++项目开发经验应该就能懂
光线与三角形求交
但是我们的目标是渲染 Cornell Box 其中都是由三角形面组成的模型,所以我们需要知道怎么求光线与三角形是否相交。
在这之前我们先学习一下计算机图形学中一个重要的概念,三角形的重心坐标。
通常我们使用三个点定义一个三角形,但是我们怎么知道三角形内部的点的坐标呢?也就是我们需要通过三角形的三个顶点计算出三角形内部点的坐标。
假设在平面 $ D $ 中有个一个三角形 $ ABC $ ,那么我们可以这么看,如果我们从点(向量) $\mathbf{A}$ 出发,沿着向量 $\mathbf{B}-\mathbf{A}$ 方向移动 $u$ 的距离,在沿着向量 $\mathbf{C}-\mathbf{A}$ 方向移动 $v$ 的距离,那么我们最终会到达三角形的内部,我们可以通过这种方式定义三角形内部的顶点,也就是三角形内部的点
展开整理可得
$$\mathbf{P} = (1-u-v)\mathbf{A}+u\mathbf{B}+v\mathbf{C}$$我们令 $w = 1-u-v$ 则
$$\mathbf{P} = w\mathbf{A}+u\mathbf{B}+v\mathbf{C}$$思路和球体一样我们联立两个方程:
$$\mathbf{r}(t) = \mathbf{A} + u(\mathbf{B}-\mathbf{A}) + v(\mathbf{C}-\mathbf{A})$$由于其中的 $t$,$u$,$v$都是未知标量,所以我们整理为非齐次线性方程的形式:
$$-t\mathbf{d}+u(\mathbf{B}-\mathbf{A})+v(\mathbf{C}-\mathbf{A}) = \mathbf{o}-\mathbf{A}$$我们令
- $\mathbf{E}_1 = \mathbf{B}-\mathbf{A}$
- $\mathbf{E}_2 = \mathbf{C}-\mathbf{A}$
- $\mathbf{S} = \mathbf{o}-\mathbf{A}$
所以我们可以将原方程组写成矩阵的形式
$$ \begin{bmatrix} -\mathbf{d} & \mathbf{E_1} &\mathbf{E_2} \end{bmatrix}\begin{bmatrix} t \\ u \\ v \end{bmatrix} = \mathbf{S} $$根据 Cramer’s Rule 我们可以求解 $t,u,v$, 我们设矩阵 $M = \begin{bmatrix} -\mathbf{d} & \mathbf{E}_1 & \mathbf{E}_2 \end{bmatrix}$,其行列式为 $|M|$
但是我们通常不这么计算,因为矩阵的行列式计算起来很麻烦,我们可以使用标量三重积
$$\det(A, B, C) = (A \times B) \cdot C = (B \times C) \cdot A = (C \times A) \cdot B$$据此我们可以把分母整理为
$$\Delta = |M| = \det(-\mathbf{d}, \mathbf{E}_1, \mathbf{E}_2) = (\mathbf{d} \times \mathbf{E}_2) \cdot \mathbf{E}_1$$令
$$\mathbf{P} = \mathbf{d} \times \mathbf{E}_2,\quad \mathbf{Q} = \mathbf{S} \times \mathbf{E}_1$$那么就可以得到更适合写成代码的形式
$$u = \frac{\mathbf{S} \cdot \mathbf{P}}{\Delta},\quad v = \frac{\mathbf{d} \cdot \mathbf{Q}}{\Delta},\quad t = \frac{\mathbf{E}_2 \cdot \mathbf{Q}}{\Delta}$$其中 $\Delta$ 接近 0 时说明射线和三角形所在平面平行;否则只需要判断 $t > 0$,$u \ge 0$,$v \ge 0$,$u + v \le 1$,即可知道射线是否击中了这个三角形。
这个算法叫做 Moller-Trumbore 算法 所以我们可以基于此实现
 1#pragma once
 2
 3#include "Object.h"
 4
 5#include <optional>
 6
 7class Triangle final : public Object {
 8public:
 9    Triangle(const Vec3& p1, const Vec3& p2, const Vec3& p3)
10        : p1_(p1),
11          p2_(p2),
12          p3_(p3)
13    {}
14
15    ~Triangle() noexcept override = default;
16
17    bool intersect(const Ray& ray) const override
18    {
19        return hitDistance(ray).has_value();
20    }
21
22    InterInfo getInterInfo(const Ray& ray) const override
23    {
24        const auto t = hitDistance(ray);
25        if (!t.has_value()) {
26            return InterInfo{false, Vec3()};
27        }
28
29        return InterInfo{true, ray(*t)};
30    }
31
32private:
33    std::optional<double> hitDistance(const Ray& ray) const
34    {
35        constexpr double kEpsilon = 1e-8;
36
37        const Vec3 origin = ray.getOrigin();
38        const Vec3 direction = ray.getDirection();
39        const Vec3 edge1 = p2_ - p1_;
40        const Vec3 edge2 = p3_ - p1_;
41        const Vec3 p = cross(direction, edge2);
42        const double det = dot(edge1, p);
43
44        if (std::abs(det) < kEpsilon) {
45            return std::nullopt;
46        }
47
48        const double inv_det = 1.0 / det;
49        const Vec3 s = origin - p1_;
50        const double u = dot(s, p) * inv_det;
51        if (u < 0.0 || u > 1.0) {
52            return std::nullopt;
53        }
54
55        const Vec3 q = cross(s, edge1);
56        const double v = dot(direction, q) * inv_det;
57        if (v < 0.0 || u + v > 1.0) {
58            return std::nullopt;
59        }
60
61        const double t = dot(edge2, q) * inv_det;
62        if (t <= kEpsilon) {
63            return std::nullopt;
64        }
65
66        return t;
67    }
68
69    Vec3 p1_;
70    Vec3 p2_;
71    Vec3 p3_;
72};
我们给Scene添加一个addTriangle方法
1void addTriangle(const Vec3& p1, const Vec3& p2, const Vec3& p3)
2{
3    addObject(std::make_unique<Triangle>(p1, p2, p3));
4}
好了现在我们已经具备了渲染 Cornell Box 的能力,我们提供了构建 Cornell Box 模型的方法:
 1Vec3 cornellVertex(double x, double y, double z)
 2{
 3    // 将标准 Cornell Box 坐标平移到以盒子开口中线为中心的局部坐标。
 4    return Vec3(x - 278.0, y - 273.0, z);
 5}
 6
 7void addQuad(Scene& scene, const Vec3& a, const Vec3& b, const Vec3& c, const Vec3& d)
 8{
 9    scene.addTriangle(a, b, c);
10    scene.addTriangle(a, c, d);
11}
12
13void buildCornellBox(Scene& scene)
14{
15    const auto v = [](double x, double y, double z) {
16        return cornellVertex(x, y, z);
17    };
18
19    // 地面、天花板、后墙、左墙、右墙
20    addQuad(scene, v(552.8, 0.0, 0.0), v(0.0, 0.0, 0.0), v(0.0, 0.0, 559.2), v(549.6, 0.0, 559.2));
21    addQuad(scene, v(556.0, 548.8, 0.0), v(556.0, 548.8, 559.2), v(0.0, 548.8, 559.2), v(0.0, 548.8, 0.0));
22    addQuad(scene, v(549.6, 0.0, 559.2), v(0.0, 0.0, 559.2), v(0.0, 548.8, 559.2), v(556.0, 548.8, 559.2));
23    addQuad(scene, v(0.0, 0.0, 559.2), v(0.0, 0.0, 0.0), v(0.0, 548.8, 0.0), v(0.0, 548.8, 559.2));
24    addQuad(scene, v(552.8, 0.0, 0.0), v(549.6, 0.0, 559.2), v(556.0, 548.8, 559.2), v(556.0, 548.8, 0.0));
25
26    // 顶灯
27    addQuad(scene, v(343.0, 548.7, 227.0), v(343.0, 548.7, 332.0), v(213.0, 548.7, 332.0), v(213.0, 548.7, 227.0));
28
29    // 矮盒子
30    addQuad(scene, v(130.0, 165.0, 65.0), v(82.0, 165.0, 225.0), v(240.0, 165.0, 272.0), v(290.0, 165.0, 114.0));
31    addQuad(scene, v(290.0, 0.0, 114.0), v(290.0, 165.0, 114.0), v(240.0, 165.0, 272.0), v(240.0, 0.0, 272.0));
32    addQuad(scene, v(130.0, 0.0, 65.0), v(130.0, 165.0, 65.0), v(290.0, 165.0, 114.0), v(290.0, 0.0, 114.0));
33    addQuad(scene, v(82.0, 0.0, 225.0), v(82.0, 165.0, 225.0), v(130.0, 165.0, 65.0), v(130.0, 0.0, 65.0));
34    addQuad(scene, v(240.0, 0.0, 272.0), v(240.0, 165.0, 272.0), v(82.0, 165.0, 225.0), v(82.0, 0.0, 225.0));
35
36    // 高盒子
37    addQuad(scene, v(423.0, 330.0, 247.0), v(265.0, 330.0, 296.0), v(314.0, 330.0, 456.0), v(472.0, 330.0, 406.0));
38    addQuad(scene, v(423.0, 0.0, 247.0), v(423.0, 330.0, 247.0), v(472.0, 330.0, 406.0), v(472.0, 0.0, 406.0));
39    addQuad(scene, v(472.0, 0.0, 406.0), v(472.0, 330.0, 406.0), v(314.0, 330.0, 456.0), v(314.0, 0.0, 456.0));
40    addQuad(scene, v(314.0, 0.0, 456.0), v(314.0, 330.0, 456.0), v(265.0, 330.0, 296.0), v(265.0, 0.0, 296.0));
41    addQuad(scene, v(265.0, 0.0, 296.0), v(265.0, 330.0, 296.0), v(423.0, 330.0, 247.0), v(423.0, 0.0, 247.0));
42}
同时我们需要修改我们的 Camera
 1Camera(int image_width,
 2        int image_height,
 3        const Vec3& position = Vec3(278, 273, -800),
 4        const Vec3& target = Vec3(0, 0, 0),
 5        const Vec3& up = Vec3(0, 1, 0),
 6        double vertical_fov = 90.0)
 7    :   position_(position),
 8        target_(target),
 9        up_(up),
10        vertical_fov_(vertical_fov),
11        image_width_(image_width),
12        image_height_(image_height),
13        aspect_ratio_(static_cast<double>(image_width) / image_height),
14        frame_buffer_(image_width * image_height)
15{
16    initCamera();
17}
在main函数中我们调整我们的相机为
1Camera camera(width, height, Vec3(0.0, 0.0, -800.0), Vec3(0.0, 0.0, 280.0), Vec3(0.0, 1.0, 0.0), 40.0);
此时main函数应该为
 1int main()
 2{
 3    const int width = 600;
 4    const int height = 600;
 5    Camera camera(width, height, Vec3(0.0, 0.0, -800.0), Vec3(0.0, 0.0, 280.0), Vec3(0.0, 1.0, 0.0), 40.0);
 6    Scene scene(camera);
 7    buildCornellBox(scene);
 8
 9    Renderer renderer;
10    renderer.render(scene.getCamera(), scene.getObjects());
11
12    writePPM("out.ppm", width, height, scene.getCamera().getFrameBuffer());
13
14    return 0;
15}
此时我们渲染我们的场景会得到下面这副图
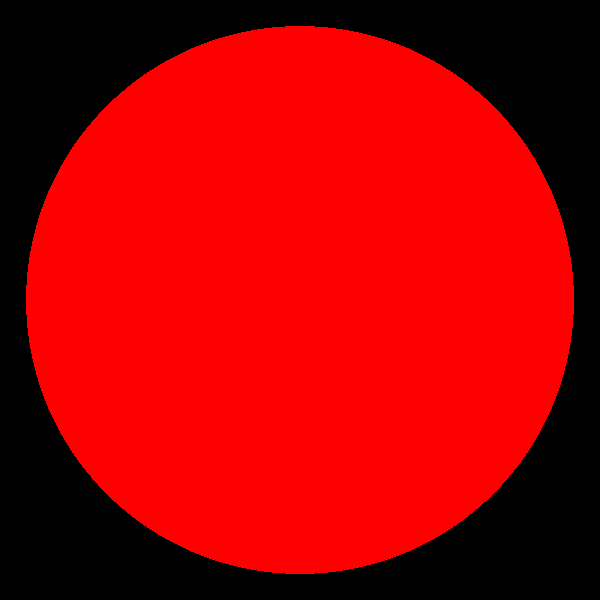
 一片红色,这是因为我们的 Renderer 目前是如果光线击中物体就直接无差异的返回红色, 所以我们可以根据我们的击中点与击中该点的ray的距离来确定颜色,距离越远颜色越深
 1#include "Camera.h"
 2#include "Ray.h"
 3#include "Scene.h"
 4#pragma once
 5
 6#include <algorithm>
 7#include <limits>
 8
 9class Renderer {
10public:
11    Renderer() = default;
12    ~Renderer() = default;
13
14    void render(Camera& camera, const std::vector<std::unique_ptr<Object>>& objects)
15    {
16        for (int j = 0; j < camera.getImageHeight(); ++j) {
17            for (int i = 0; i < camera.getImageWidth(); ++i) {
18                Ray ray = camera.getRay(i, j);
19                Vec3 pixel_color = traceRay(ray, objects);
20                camera.getFrameBuffer()[j * camera.getImageWidth() + i] = pixel_color;
21            }
22        }
23    }
24
25private:
26    Vec3 traceRay(const Ray& ray, const std::vector<std::unique_ptr<Object>>& objects)
27    {
28        double closest_t = std::numeric_limits<double>::infinity();
29        bool hit_anything = false;
30
31        for (const auto& object : objects) {
32            const InterInfo info = object->getInterInfo(ray);
33            if (!info.is_Intersected) {
34                continue;
35            }
36
37            // 计算射线到交点的距离
38            const double t = (info.position - ray.getOrigin()).length();
39            // 如果距离小于0或者大于当前最短距离,则忽略
40            if (t <= 0.0 || t >= closest_t) {
41                continue;
42            }
43
44            closest_t = t;
45            hit_anything = true;
46        }
47
48        if (!hit_anything) {
49            return Vec3(0.0, 0.0, 0.0);
50        }
51
52        const double shade = std::clamp(1.0 - closest_t / 1400.0, 0.15, 1.0);
53        return Vec3(255.0 * shade, 255.0 * shade, 255.0 * shade);
54    }
55};
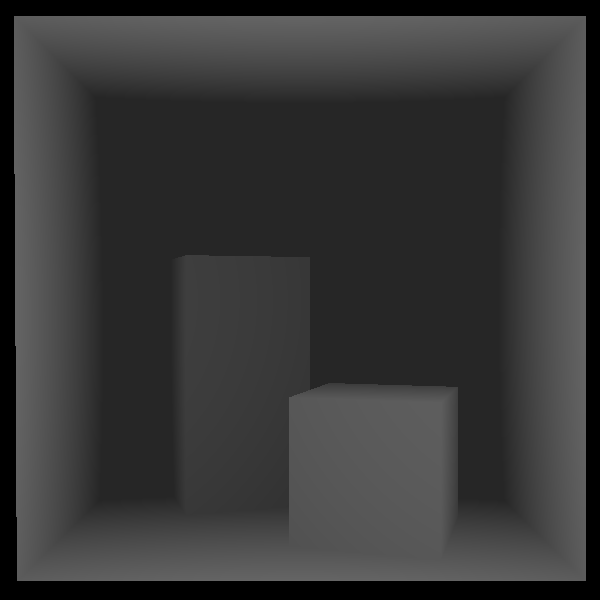
最后渲染出来的图为
PBR
终于我们看到了一些有趣的效果了,接下来我们将进入复杂的领域也就是 基于物理的渲染(Physically Based Rendering) 简称PBR。
这是一种着色模型,它基于物理公式来描述光线怎么传输,光线的能量,光线的反弹,物体的材质等等。
而我们首先介绍一下物体的材质,后面我们一步一步的向前推进知道我们对整个PBR有基本的认识,同时你会完成整个简单Path Tracing Renderer
材质 Material
我们都知道我们的现实世界中有各种各样的材质,木头,铁,布料等等。为什么我们能够通过观察,也就是光进入你的眼睛就能判断这个物体是什么材质呢?这是因为不同的物体的材质的属性各不相同,光线会以不同的方式反射到你的眼睛中所导致的。
所以材质就是定义了光线如何反射,我们高中就学过一些几何光学的知识,我们知道漫反射和镜面反射,这是由材质中一个名为粗糙度 Rougness 决定的,并且如果是标准的镜面反射,那么光线会被反射到以光线击中的这个平面法线的对称位置。
所以材质中一个很重要的属性就是Roughness和法线n。
法线我们可以在几何中获取,而材质我们需要单独定义。
球体的法线
对于一个球体,它的法线非常好获取,假设我们的光线击中了球体的点$\mathbf{P}$,我们需要获取该点的法线向量$\mathbf{n}$,那么
$$\mathbf{n} = \frac{\mathbf{P}-\mathbf{C}}{r} $$其中$\mathbf{C}$是球体的球心,$r$是球体的半径。
三角形的法线
对于一个三角形,它的法线也非常好获取,通常我们需要定义一个面的正反面,这决定了我们法线的方向,通常我们法线是指向正面的单位向量,我们可以通过三角形边构成的向量的叉乘定义法线,而向量叉乘的顺时针逆时针的结果是不同的,由于我们提供的构建 Cornell Box的代码中,我们使用的是逆时针定义,所以我们将使用逆时针定义的法线。 对于一个三角形 $ABC$ ,假设三角形的三个顶点分别为 $\mathbf{A}, \mathbf{B}, \mathbf{C}$,逆时针顺序 $\mathbf{A}\to\mathbf{B}\to\mathbf{C}$, 则法线向量 $\mathbf{n}$ 可以通过向量叉乘得到:
$$\mathbf{n} = \frac{(\mathbf{B} - \mathbf{A} )\times (\mathbf{C} - \mathbf{A})}{||(\mathbf{B} - \mathbf{A} )\times (\mathbf{C} - \mathbf{A})||}$$三角形的法线与交点无关,球体的法线与交点有关。我们这个教程不考虑背面是怎么反射的。
由于我们需要获取法线信息,并且我们可能会使用到最小的t所以
1struct InterInfo {
2    bool is_Intersected = false;
3    Vec3 position;
4    Vec3 normal;
5    double closest_t;
6};
更新球体的法线信息:
 1InterInfo getInterInfo(const Ray& ray) const override
 2{
 3    ...
 4    double t = t1 < t2 ? t1 : t2; // 选择较小的正根
 5        if (t > 1e-8) {
 6            Vec3 hit_position = ray(t);
 7            Vec3 normal = (hit_position - center_) / radius_;
 8            return InterInfo{true, hit_position, normal, t};
 9        }
10    }
11    ...
12    return InterInfo{false, Vec3(), Vec3(), std::numeric_limits<double>::infinity()};
13}
更新三角形的法线信息:
 1class Triangle final : public Object {
 2public:
 3    Triangle(const Vec3& p1, const Vec3& p2, const Vec3& p3)
 4        : p1_(p1),
 5          p2_(p2),
 6          p3_(p3)
 7    {
 8        normal_ = cross((p2_ - p1_), (p3_ - p1_));
 9        normal_ = unitVector(normal_);
10    }
11...
12    InterInfo getInterInfo(const Ray& ray) const override
13    {
14        const auto t = hitDistance(ray);
15        if (!t.has_value()) {
16            return InterInfo{false, Vec3(), Vec3(), std::numeric_limits<double>::infinity()};
17        }
18
19        return InterInfo{true, ray(*t), normal_, t.value()};
20    }
21...
22    Vec3 p1_;
23    Vec3 p2_;
24    Vec3 p3_;
25    Vec3 normal_;
26};
据此我们可以更新我们的渲染器代码:
我们可以直接将法线作为颜色输出
 1Vec3 traceRay(const Ray& ray, const std::vector<std::unique_ptr<Object>>& objects)
 2{
 3    double closest_t = std::numeric_limits<double>::max();
 4    Vec3 normal;
 5    bool hit_anything = false;
 6
 7    for (const auto& object : objects) {
 8        InterInfo info = object->getInterInfo(ray);
 9        if (!info.is_Intersected || info.closest_t >= closest_t) {
10            continue;
11        }
12
13        closest_t = info.closest_t;
14        normal = info.normal;
15        hit_anything = true;
16    }
17
18    if (!hit_anything) {
19        return Vec3(0.0, 0.0, 0.0);
20    }
21
22    // 将法线从[-1,1]映射到[0,1]
23    const Vec3 mapped_normal = 0.5 * (normal + Vec3(1.0, 1.0, 1.0));
24    return 255.0 * mapped_normal;
25}
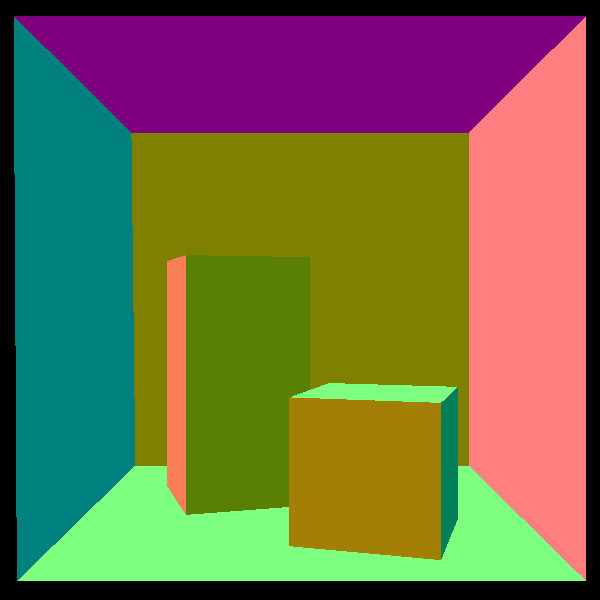
渲染后我们能得到这么一张图
光线的传播
在实现材质之前我想必须得介绍一下 Path Tracing 中最重要的一些概念,我们现在的渲染器对光线的处理非常简单,在击中物体之后就直接结束了,但是我们现实世界中的光线会进行多次弹射,而正确的Path Tracing 就是模拟这种多次弹射的过程。而在实现这个效果之前,也就是现在我们必须介绍一下 Radiometry 辐射度量学,因为我们通过 Radiometry 这个物理模型解释光的能量是怎么传播的
Radiant Energy
光本质上是电磁波,而只要是波就能携带能量。我们将光所携带的能量称为辐射能。
符号:$Q$, 单位:焦耳 $J$
Radiant Flux
在图形学中我们通常不会使用辐射能来计算光照,因为如果一个光源一直发光那么它释放的能量是无限变大的。 而在图形学中,我们更关注一帧画面中的能量。即Radiant Flux
- 定义:单位时间内 Radiant Energy 的变化量
- 符号:$\Phi$
- 单位:瓦特 $W$,或者焦耳每秒 $J/s$
公式: $$\Phi = \frac{dQ}{dt}$$
Solid Angle
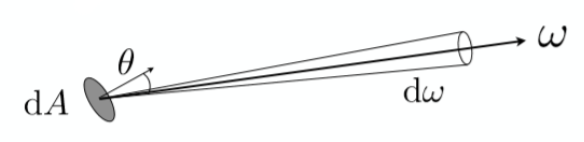
在介绍其他的物理量之前先介绍一下立体角,因为这些物理量需要使用到立体角。
立体角是一个数学中的概念,类似于二维平面上,我们使用弧度表示来表示一个二维角度 $\theta = \frac{s}{r} $。
类似的,在三维空间中,我们使用类似的定义来表示立体角。
(除以半径的平方对应了物理中的平方反比定律)
- 单位: 球面度 (Steradian, sr)
例1:
计算整个球体和半球的立体角:
根据球体面积公式: $A = 4\pi r^2$
微分立体角
在球体上我们通常使用经纬度来表示一个点的位置
- 极角 $\theta$ :与 $z$ 轴的夹角 $[0, \pi]$
- 方位角 $\phi$ :在 $xy$ 平面上的投影与 $x$ 轴的夹角,范围 $[0, 2\pi]$。
- 定义 $$ d\omega = \frac{dA}{r^2} $$ 其中
 所以原公式可以化简为
例2
使用微分立体角计算半个球体的立体角:
(积分区域是矩形且被积函数是可分离的,所以可以化为两个独立定积分)
Intensity
Radiant Flux描述的是光源向所有方向发射的总功率,但光源在不同方向发出的能量是不同的。辐射强度用于描述光源在特定方向上的发光能力。
- 定义:单位立体角内的 Radiant Flux 的变化率
- 符号:$I$
- 单位:瓦特每立体角 $W/sr$
- 公式:
$$ I(\omega) =\lim_{\Delta\omega \to 0}\frac{\Delta \Phi}{\Delta \omega}= \frac{d\Phi}{d\omega} $$
如果一个光源是各项同性的,那么它的 Radiant Intensity 是 $I = \frac{\Phi}{4\pi}$($4\pi$ 是整个球的立体角)
irradiance
Irradiance 描述了某一个表面上接受的 Radiant Flux。
- 定义: 单位面积内的接受的 Radiant Flux 的变化率
- 符号:$E$
- 单位:瓦特每平方米 $W/m^2$
- 公式: $$ E(p) =\lim_{\Delta A \to 0}\frac{\Delta \Phi(p)}{\Delta A}= \frac{d\Phi(p)}{ dA} $$
Radiance
它结合了方向和面积,描述了光线在空间中沿一条射线的强度
- 定义: 单位立体角、单位投影面积上的辐射通量。
- 符号:$L$
- 单位:$\frac{W}{sr\cdot m^2}$
- 公式: $$L(p, \omega)= \lim_{\Delta\omega \to 0}\frac{\Delta E_{\omega}(p)}{\Delta \omega}=\frac{d E_{\omega}(p)}{d\omega}= \frac{d^2\Phi}{d\omega dA }$$ (其中 $p$ 是表面上的点,$\omega$ 是光线方向,$\theta$ 是光线方向与表面法线的夹角)。
实际上 $ dA cos\theta $才是radiance中所定义的面积
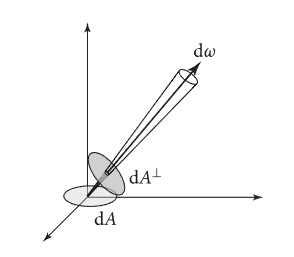 所以原方程为
**好了上面的都不重要重要的是下面这些概念 **
BRDF 双向反射分布函数
BRDF(双向反射分布函数,Bidirectional Reflectance Distribution Function)是计算机图形学和光学中用于描述光线在不透明表面如何反射的核心概念。它定义了物体的材质,描述了入射光是如何被反射到其他方向上去的。它的定义是:“在某个点上,在某个给定方向上反射出去的Radiance,与 从某个给定方向入射的Irradiance 之间的比例关系”。
根据其定义:
- $\omega_i$:入射光方向
- $\omega_o$:反射光方向
- $dL_r(\omega_o)$:表面在 $\omega_o$ 方向反射出去的radiance
- $dE_i(\omega_i)$:来自 $\omega_i$ 方向的微分入射irradiance
- $\theta_i$:入射光与表面法线的夹角
简单来说 BRDF 它定义了材质,材质定义了光线如何反射,所以BRDF就是定义了光如何反射, 如果有来自方向 $\omega_i$ 的irradiance $dE_i$ 照到这一点,那么在 $\omega_o$ 方向上产生的反射radiance $dL_r$ 是多少
反射方程
有了 BRDF 那么我们就可以定义出反射方程了。很显然观察者接受到的物体的反射光是由不同方向上照射到物体表面经过材质反射的入射光贡献而来的。对 BRDF 方程两边同时乘以分子再对整个半球做积分就得到了:
由此我们可以根据这个方程计算出出射光了。
简单来说,如果我们有一束光 $L_i$ 从$\omega_i$方向入射到$f_r(\omega_i, \omega_o)$上最终变为$ \omega_o$方向的出射光,而我们需要的就是$ \omega_o$方向的出射光,我们对半球上所有的入射光进行积分(因为光可能来自半球中的所有位置),就得到$ \omega_o$方向的出射光了。
渲染方程
渲染方程 Rendering Equation 只是在反射方程的基础之上添加了一个自发光项(Emission term),物体可能自己会发光
$$L_o( \omega_o) = L_e( \omega_o) + \int_{\mathcal{H} } f_r(\omega_i, \omega_o) L_i(\omega_i) \cos\theta_i d\omega_i$$我们观察 Rendering Equation 可以发现,这是一个积分方程,并且是递归定义的积分方程,所以想要得到解析解几乎是不可能的,而且其中还有一个及其复杂的BRDF我们不知道怎么算,我们只知道它的定义式。
微表面理论 Microsurface Theory
为了解决我们的 BRDF 的计算问题,我们引入了 Mircosurface Theory ,在 Mircosurface Theory 中假设所有的物体的表面在微观层面下都是由微小的朝向各不相同的绝对镜面反射平面组成的。
而在 Mircosurface Theory 下最经典的 BRDF 模型是 Cook-Torrance BRDF 模型 ,在Cook-Torrance BRDF 模型下 BRDF 为:
$$f_r = k_d f_{lambert} + k_s f_{cook-torrance}$$- $k_d$:漫反射系数。
- $k_s$:镜面反射系数
- $f_{lambert} = \frac{c}{\pi}$:最基础的兰伯特漫反射($c$ 为表面颜色)
其中
- D (Distribution Function): 法线分布函数,它描述了有多少比例的微表面法线正好对准了能把光线反射到你眼睛里的方向
- G (Geometry Function): 几何函数,描述了微表面之间的自遮挡(Shadowing)和自掩蔽(Masking)
- F (Fresnel Term): 菲涅尔项,决定了光线在不同角度下的反射率
而我们最终的目标渲染出一个标准的 Cornell Box 是不需要
$$f_{cook-torrance} $$的因为这是一个纯漫反射场景
漫反射材质
由于我们的目标Cornell Box是一个纯漫反射场景所以Material的实现将会变得非常简单
 1#pragma once
 2#include "Vec3.h"
 3
 4class Material {
 5public:
 6    Material(const Vec3& base_color, const double& kd)
 7        : base_color_(base_color),
 8          kd_(kd)
 9    {}
10
11    Vec3 eval() const
12    {
13        return kd_ * base_color_ / (3.141592653589793);
14    }
15
16private:
17    Vec3 base_color_{};
18    double kd_ = 1.0;
19};
由于 kd_和 base_color_在数学上是线性相关的。通常我们会把它们合二为一,直接叫 Albedo,所以代码改为
 1#pragma once
 2#include "Vec3.h"
 3
 4class Material {
 5public:
 6    Material(const Vec3& albedo)
 7        : albedo_(albedo)
 8    {}
 9
10    Vec3 eval() const
11    {
12        return albedo_ / (3.141592653589793);
13    }
14
15private:
16    Vec3 albedo_;
17};
让后我们修改Object,让其拥有Material
 1...
 2
 3class Object {
 4public:
 5    explicit Object(std::shared_ptr<Material> material = nullptr)
 6        : material_(std::move(material))
 7    {}
 8
 9    virtual ~Object() = default;
10    virtual bool intersect(const Ray& ray) const = 0;
11    virtual InterInfo getInterInfo(const Ray& ray) const = 0;
12
13    std::shared_ptr<Material> getMaterial() const
14    {
15        return material_;
16    }
17
18protected:
19    InterInfo inter_info_;
20    std::shared_ptr<Material> material_ = nullptr;
21};
同时Sphere 和 Triangle 也要更新
 1...
 2class Sphere final : public Object {
 3public:
 4    Sphere(const Vec3& center, double radius, std::shared_ptr<Material> material = nullptr)
 5        : Object(std::move(material)),
 6          center_(center),
 7          radius_(radius)
 8    {}
 9...
10};
 1...
 2class Triangle final : public Object {
 3public:
 4    Triangle(const Vec3& p1, const Vec3& p2, const Vec3& p3, std::shared_ptr<Material> material = nullptr)
 5        : Object(std::move(material)),
 6          p1_(p1),
 7          p2_(p2),
 8          p3_(p3)
 9    {
10        normal_ = cross((p2_ - p1_), (p3_ - p1_));
11        normal_ = unitVector(normal_);
12    }
13...
14};
并且我们提供了标准的Cornell Box材质
1Vec3 cornellVertex(double x, double y, double z)
2{
3 // 将标准 Cornell Box 坐标平移到以盒子开口中线为中心的局部坐标。
4 return Vec3(x - 278.0, y - 273.0, z);
5}
6
7void addQuad(Scene& scene,
8 const Vec3& a,
9 const Vec3& b,
10 const Vec3& c,
11 const Vec3& d,
12 const std::shared_ptr<Material>& material)
13{
14 scene.addTriangle(a, b, c, material);
15 scene.addTriangle(a, c, d, material);
16}
17
18void buildCornellBox(Scene& scene)
19{
20 const auto v = [](double x, double y, double z) {
21 return cornellVertex(x, y, z);
22 };
23
24 const std::shared_ptr<Material> white = makeCornellMaterial(0.725, 0.710, 0.680);
25 const std::shared_ptr<Material> red = makeCornellMaterial(0.630, 0.065, 0.050);
26 const std::shared_ptr<Material> green = makeCornellMaterial(0.140, 0.450, 0.091);
27 const std::shared_ptr<Material> light = makeCornellMaterial(1.000, 1.000, 1.000);
28
29 // 地面、天花板、后墙、左墙、右墙
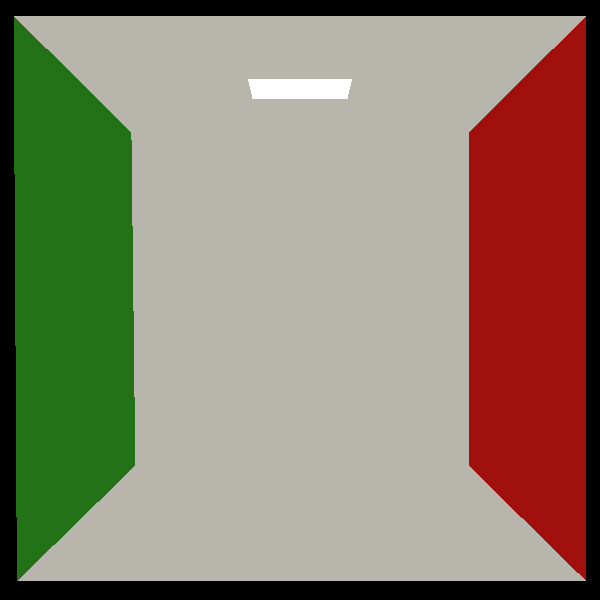
30 addQuad(scene, v(552.8, 0.0, 0.0), v(0.0, 0.0, 0.0), v(0.0, 0.0, 559.2), v(549.6, 0.0, 559.2), white);
31 addQuad(scene, v(556.0, 548.8, 0.0), v(556.0, 548.8, 559.2), v(0.0, 548.8, 559.2), v(0.0, 548.8, 0.0), white);
32 addQuad(scene, v(549.6, 0.0, 559.2), v(0.0, 0.0, 559.2), v(0.0, 548.8, 559.2), v(556.0, 548.8, 559.2), white);
33 addQuad(scene, v(0.0, 0.0, 559.2), v(0.0, 0.0, 0.0), v(0.0, 548.8, 0.0), v(0.0, 548.8, 559.2), red);
34 addQuad(scene, v(552.8, 0.0, 0.0), v(549.6, 0.0, 559.2), v(556.0, 548.8, 559.2), v(556.0, 548.8, 0.0), green);
35
36 // 顶灯
37 addQuad(scene, v(343.0, 548.7, 227.0), v(343.0, 548.7, 332.0), v(213.0, 548.7, 332.0), v(213.0, 548.7, 227.0), light);
38
39 // 矮盒子
40 addQuad(scene, v(130.0, 165.0, 65.0), v(82.0, 165.0, 225.0), v(240.0, 165.0, 272.0), v(290.0, 165.0, 114.0), white);
41 addQuad(scene, v(290.0, 0.0, 114.0), v(290.0, 165.0, 114.0), v(240.0, 165.0, 272.0), v(240.0, 0.0, 272.0), white);
42 addQuad(scene, v(130.0, 0.0, 65.0), v(130.0, 165.0, 65.0), v(290.0, 165.0, 114.0), v(290.0, 0.0, 114.0), white);
43 addQuad(scene, v(82.0, 0.0, 225.0), v(82.0, 165.0, 225.0), v(130.0, 165.0, 65.0), v(130.0, 0.0, 65.0), white);
44 addQuad(scene, v(240.0, 0.0, 272.0), v(240.0, 165.0, 272.0), v(82.0, 165.0, 225.0), v(82.0, 0.0, 225.0), white);
45
46 // 高盒子
47 addQuad(scene, v(423.0, 330.0, 247.0), v(265.0, 330.0, 296.0), v(314.0, 330.0, 456.0), v(472.0, 330.0, 406.0), white);
48 addQuad(scene, v(423.0, 0.0, 247.0), v(423.0, 330.0, 247.0), v(472.0, 330.0, 406.0), v(472.0, 0.0, 406.0), white);
49 addQuad(scene, v(472.0, 0.0, 406.0), v(472.0, 330.0, 406.0), v(314.0, 330.0, 456.0), v(314.0, 0.0, 456.0), white);
50 addQuad(scene, v(314.0, 0.0, 456.0), v(314.0, 330.0, 456.0), v(265.0, 330.0, 296.0), v(265.0, 0.0, 296.0), white);
51 addQuad(scene, v(265.0, 0.0, 296.0), v(265.0, 330.0, 296.0), v(423.0, 330.0, 247.0), v(423.0, 0.0, 247.0), white);
52}
我们的渲染器需要修改为
 1Vec3 traceRay(const Ray& ray, const std::vector<std::unique_ptr<Object>>& objects)
 2{
 3    double closest_t = std::numeric_limits<double>::max();
 4    bool hit_anything = false;
 5    std::shared_ptr<Material> material = nullptr;
 6    for (const auto& object : objects) {
 7        InterInfo info = object->getInterInfo(ray);
 8        if (!info.is_Intersected || info.closest_t >= closest_t) {
 9            continue;
10        }
11
12        closest_t = info.closest_t;
13        hit_anything = true;
14        material = object->getMaterial();
15    }
16
17    if (!hit_anything || !material) {
18        return Vec3(0.0, 0.0, 0.0);
19    }
20
21    return material->eval();
22}
这时候我们渲染出来的图形是这样的
 这是因为我们的光线击中物体后会直接返回改物体的材质颜色,我们还没有使用最标准的渲染方程进行渲染,还记得我们的渲染方程吗
这个积分方程我们没方法求得其解析解,所以我们需要通过数值的方式求解,而在图形学中用的最广泛的方法就是蒙特卡洛积分,这是一个概率论中的方法。
你可以这么理解蒙特卡洛积分,想象一下你在求一个单变量实函数的定积分,但是这个定积分也是求不出来的,我们知道定积分实际上就是求面积,所以我们可以这么做:
对于积分区间为$[a,b]$
我们在区间中均匀取一个$c_i\in[a,b]$,可以求得:
$$S_i = (b-a)f(c_i)$$如果我们对这个过程进行无穷多次,并求和取平均,即
$$S_t = \lim_{N\to\infty} \frac{1}{N}\sum_{i=1}^{N}S_i =\lim_{N\to\infty}\frac{1}{N} \sum_{i=1}^{N}(b-a)f(c_i)$$那么最后
$$I = S_t$$背后的数学证明就不推导了,因为我们的目的是实现出一个 Path Tracing 渲染器!
蒙特卡洛积分就是这么个过程,我们要计算这么一个反射方程:
我们需要找到一个$p(x)$,然后通过蒙特卡洛积分,
$$\hat{L}_o(\omega_o) = \frac{1}{N} \sum_{j=1}^{N} \frac{f_r(\omega_i, \omega_j) L_i(\omega_j) \cos\theta_j}{p(\omega_j)}$$其中我们的$f_r = k_d\frac{c}{\pi}$,$p(x)$是概率密度函数,通常我们需要选择一个$p(x)$它的分布与BRDF的反射分布一致, 漫反射当一个入射光击中这个点他会均匀的向半球反射光线,所以我们这里$p(x)$将会选择在半球随机均匀采样,也就是
$$\int_0^{2\pi} \int_0^{\pi/2} C \sin\theta d\theta d\phi = C \cdot 2\pi = 1 \implies C = \frac{1}{2\pi}$$ 1...
2class Material {
3public:
4 Material(const Vec3& albedo)
5 : albedo_(albedo)
6 {}
7
8 Vec3 eval() const
9 {
10 return albedo_ / (3.141592653589793);
11 }
12
13 double pdf(const Vec3& wi, const Vec3& wo, const Vec3& normal)
14 {
15 const double cosThetaI = dot(normal, wi);
16 const double cosThetaO = dot(normal, wo);
17
18 // 如果入射或出射方向在表面以下,概率为 0
19 if (cosThetaI <= 0.0 || cosThetaO <= 0.0) {
20 return 0.0;
21 }
22
23 // 均匀半球采样的 PDF = 1 / (2 * PI)
24 return 1.0 / (2.0 * 3.141592653589793);
25 }
26
27
28private:
29 Vec3 albedo_;
30};
并且我们需要对$p(x)$进行在给定的入射光$w_o$采样得到出射光$w_i$,不然我们没法获取出射光, 这其中会用到这几个函数与我们的主线无关我们提供给你
 1static double randomDouble()
 2{
 3    static thread_local std::mt19937 generator(std::random_device{}());
 4    static thread_local std::uniform_real_distribution<double> distribution(0.0, 1.0);
 5    return distribution(generator);
 6}
 7
 8static Vec3 sampleUniformHemisphere()
 9{
10    const double z = randomDouble();
11    const double phi = 2.0 * 3.141592653589793 * randomDouble();
12    const double r = std::sqrt(std::max(0.0, 1.0 - z * z));
13
14    return Vec3(r * std::cos(phi), r * std::sin(phi), z);
15}
16
17static Vec3 toWorld(const Vec3& local, const Vec3& normal)
18{
19    const Vec3 n = unitVector(normal);
20    const Vec3 helper = std::abs(n.x()) > 0.9 ? Vec3(0.0, 1.0, 0.0) : Vec3(1.0, 0.0, 0.0);
21    const Vec3 tangent = unitVector(cross(helper, n));
22    const Vec3 bitangent = cross(n, tangent);
23
24    return local.x() * tangent + local.y() * bitangent + local.z() * n;
25}
最终我们的材质变为:
 1#pragma once
 2#include "Vec3.h"
 3
 4#include <cmath>
 5
 6#include <optional>
 7#include <random>
 8
 9class Material {
10public:
11    Material(const Vec3& albedo)
12        : albedo_(albedo)
13    {}
14
15    Vec3 eval() const
16    {
17        return albedo_ / (3.141592653589793);
18    }
19
20    // 计算在入射光w_i,出射光w_o的光照条件下,入射光被反射到出射光方向上的概率
21    double pdf(const Vec3& wi, const Vec3& wo, const Vec3& normal)
22    {
23        const double cosThetaI = dot(normal, wi);
24        const double cosThetaO = dot(normal, wo);
25
26        // 如果入射或出射方向在表面以下,概率为 0
27        if (cosThetaI <= 0.0 || cosThetaO <= 0.0) {
28            return 0.0;
29        }
30
31        // 均匀半球采样的 PDF = 1 / (2 * PI)
32        return 1.0 / (2.0 * 3.141592653589793);
33    }
34
35    // 在给定入射光wi,通过采样获得出射光wo
36    std::optional<Vec3> sample(const Vec3& wi, const Vec3& normal)
37    {
38        Vec3 local_wo = sampleUniformHemisphere();
39        // 由于我们采样获得的向量是在着色点的本地坐标的所以我们需要转换到世界坐标
40        Vec3 wo = toWorld(local_wo, normal);
41
42        if (dot(normal, wo) <= 1e-6) {
43            return std::nullopt;
44        }
45
46        return unitVector(wo);
47    }
48
49private:
50    static double randomDouble()
51    {
52        static thread_local std::mt19937 generator(std::random_device{}());
53        static thread_local std::uniform_real_distribution<double> distribution(0.0, 1.0);
54        return distribution(generator);
55    }
56
57    static Vec3 sampleUniformHemisphere()
58    {
59        const double z = randomDouble();
60        const double phi = 2.0 * 3.141592653589793 * randomDouble();
61        const double r = std::sqrt(std::max(0.0, 1.0 - z * z));
62
63        return Vec3(r * std::cos(phi), r * std::sin(phi), z);
64    }
65
66    static Vec3 toWorld(const Vec3& local, const Vec3& normal)
67    {
68        const Vec3 n = unitVector(normal);
69        const Vec3 helper = std::abs(n.x()) > 0.9 ? Vec3(0.0, 1.0, 0.0) : Vec3(1.0, 0.0, 0.0);
70        const Vec3 tangent = unitVector(cross(helper, n));
71        const Vec3 bitangent = cross(n, tangent);
72
73        return local.x() * tangent + local.y() * bitangent + local.z() * n;
74    }
75
76    Vec3 albedo_;
77};
还记得我们文章最开始提到的"最后打到光源"吗,所以我们需要标记一下这个物体是不是光源。
我们修改我们的Object类
 1...
 2
 3class Object {
 4public:
 5    explicit Object(std::shared_ptr<Material> material = nullptr, bool is_light = false)
 6        : material_(std::move(material)),
 7          is_light_(is_light)
 8    {}
 9
10   ...
11    bool is_light_ = false;
12};
并且修改Sphere、Triangle、Scene
1...
2Sphere(const Vec3& center, double radius, std::shared_ptr<Material> material = nullptr, bool is_light = false)
3    : Object(std::move(material), is_light),
4        center_(center),
5        radius_(radius)
6{}
7...
 1...
 2Triangle(const Vec3& p1,
 3            const Vec3& p2,
 4            const Vec3& p3,
 5            std::shared_ptr<Material> material = nullptr,
 6            bool is_light = false)
 7    : Object(std::move(material), is_light),
 8        p1_(p1),
 9        p2_(p2),
10        p3_(p3)
11{
12    normal_ = cross((p2_ - p1_), (p3_ - p1_));
13    normal_ = unitVector(normal_);
14}
15...
 1void addSphere(const Vec3& center, double radius, std::shared_ptr<Material> material = nullptr, bool is_light = false)
 2{
 3    addObject(std::make_unique<Sphere>(center, radius, std::move(material), is_light));
 4}
 5
 6void addTriangle(const Vec3& p1,
 7                    const Vec3& p2,
 8                    const Vec3& p3,
 9                    std::shared_ptr<Material> material = nullptr,
10                    bool is_light = false)
11{
12    addObject(std::make_unique<Triangle>(p1, p2, p3, std::move(material), is_light));
13}
我们还需要修改我们的Cornell box的构建函数
 1void addQuad(Scene& scene,
 2             const Vec3& a,
 3             const Vec3& b,
 4             const Vec3& c,
 5             const Vec3& d,
 6             const std::shared_ptr<Material>& material,
 7             bool is_light = false)
 8{
 9    scene.addTriangle(a, b, c, material, is_light);
10    scene.addTriangle(a, c, d, material, is_light);
11}
12...
13 // 顶灯
14    addQuad(scene, v(343.0, 548.7, 227.0), v(343.0, 548.7, 332.0), v(213.0, 548.7, 332.0), v(213.0, 548.7, 227.0), light, true);
最后我们只需要实现光线的递归就行了,在此之前我们先给我们的相机中的getRay()函数修改一下
 1...
 2Ray getRay(int i, int j) const
 3{
 4    return getRay(i, j, 0.0, 0.0);
 5}
 6
 7Ray getRay(int i, int j, double offset_u, double offset_v) const
 8{
 9    Vec3 pixel_center =
10        pixel_left_top_ + ((i + offset_u) * pixel_delta_u_) + ((j + offset_v) * pixel_delta_v_);
11    Vec3 ray_direction = unitVector(pixel_center - position_);
12    return Ray{position_, ray_direction};
13}
14...
这样我们可以在一个像素点中进行偏移微小的偏移,这样我们可以多次采样一个像素点,从而得到一个更精确的图像,因为我们如果只采样一次像素点,那么从这个像素中射出的光线很有可能最终不会命中光源,那么这个像素的颜色就会是黑色
最终我们的渲染器长这个样子
  1...
  2class Renderer {
  3public:
  4    Renderer() = default;
  5    ~Renderer() = default;
  6
  7    void render(Camera& camera, const std::vector<std::unique_ptr<Object>>& objects)
  8    {
  9        for (int j = 0; j < camera.getImageHeight(); ++j) {
 10            for (int i = 0; i < camera.getImageWidth(); ++i) {
 11                Vec3 pixel_color;
 12                // 多次采样同一个像素,在同一个像素中进行微小偏移,因为可能一次光线追踪找不到光源,渲染出来的像素就是黑的
 13                for (int sample = 0; sample < kSamplesPerPixel; ++sample) {
 14                    const Ray ray = camera.getRay(i, j, randomOffset(), randomOffset());
 15                    pixel_color += traceRay(ray, objects);
 16                }
 17                // 由于我们 pixel_color += traceRay(ray, objects);所以我们需要平均回去
 18                pixel_color /= kSamplesPerPixel;
 19                camera.getFrameBuffer()[j * camera.getImageWidth() + i] = pixel_color;
 20            }
 21            printProgress(j + 1, camera.getImageHeight());
 22        }
 23    }
 24
 25private:
 26    // 递归深度
 27    static constexpr int kMaxDepth = 5;
 28    // 一个像素的采样次数
 29    static constexpr int kSamplesPerPixel = 8;
 30
 31    Vec3 traceRay(const Ray& ray, const std::vector<std::unique_ptr<Object>>& objects)
 32    {
 33        // 递归调用
 34        return traceRay(ray, objects, kMaxDepth);
 35    }
 36
 37    Vec3 traceRay(const Ray& ray, const std::vector<std::unique_ptr<Object>>& objects, int depth)
 38    {
 39        // 递归出口
 40        if (depth <= 0) {
 41            return Vec3(0.0, 0.0, 0.0);
 42        }
 43
 44        bool hit_anything = false;
 45        bool is_light = false;
 46        double closest_t = std::numeric_limits<double>::max();
 47        InterInfo closest_info;
 48        std::shared_ptr<Material> material = nullptr;
 49
 50        for (const auto& object : objects) {
 51            const InterInfo info = object->getInterInfo(ray);
 52            if (!info.is_Intersected || info.closest_t >= closest_t) {
 53                continue;
 54            }
 55
 56            hit_anything = true;
 57            is_light = object->isLight();
 58            closest_t = info.closest_t;
 59            closest_info = info;
 60            material = object->getMaterial();
 61        }
 62
 63        if (!hit_anything || !material) {
 64            return Vec3(0.0, 0.0, 0.0);
 65        }
 66
 67        // 如果打到光源就直接返回光源的材质颜色
 68        if (is_light) {
 69            return material->eval();
 70        }
 71
 72        // 在计算的时候向量起点都设在交点上
 73        const Vec3 wo = -ray.getDirection();
 74        // 判断wo是否在物体的正面,如果不是则矫正
 75        const Vec3 normal = faceForward(closest_info.normal, wo);
 76
 77        // 在给定入射光wi,通过采样获得出射光wo
 78        const std::optional<Vec3> sampled_direction = material->sample(wo, normal);
 79        if (!sampled_direction.has_value()) {
 80            return Vec3(0.0, 0.0, 0.0);
 81        }
 82
 83        // 获取pdf的值
 84        const double sample_pdf = material->pdf(*sampled_direction, wo, normal);
 85        if (sample_pdf <= 1e-8) {
 86            return Vec3(0.0, 0.0, 0.0);
 87        }
 88
 89        // 计算被积函数中的cos项
 90        const double cos_theta = std::max(0.0, dot(normal, *sampled_direction));
 91        // 获取反射后的光线,+ normal * 1e-4是向物体表面偏移一点点为了防止光线与物体表面相交,
 92        const Ray scattered_ray(closest_info.position + normal * 1e-4, *sampled_direction);
 93        // 递归
 94        const Vec3 incoming_light = traceRay(scattered_ray, objects, depth - 1);
 95
 96        // 返回最终颜色
 97        return material->eval() * incoming_light * (cos_theta / sample_pdf);
 98    }
 99
100    // 判断wo是否在物体的正面,如果不是则矫正
101    Vec3 faceForward(const Vec3& normal, const Vec3& direction) const
102    {
103        return dot(normal, direction) < 0.0 ? -normal : normal;
104    }
105
106    // 用于在像素点中进行偏移
107    double randomOffset() const
108    {
109        static thread_local std::mt19937 generator(std::random_device{}());
110        static thread_local std::uniform_real_distribution<double> distribution(-0.5, 0.5);
111        return distribution(generator);
112    }
113
114    // 添加一个渲染进度条,以便我们知道还有多久可以渲染好
115    void printProgress(int completed_rows, int total_rows) const
116    {
117        const double progress = static_cast<double>(completed_rows) / total_rows;
118        const int filled = static_cast<int>(progress * 40);
119
120        std::cout << "\rRendering [";
121        for (int i = 0; i < 40; ++i) {
122            std::cout << (i < filled ? '#' : '-');
123        }
124        std::cout << "] " << static_cast<int>(progress * 100.0) << "%";
125
126        if (completed_rows == total_rows) {
127            std::cout << '\n';
128        }
129        std::cout << std::flush;
130    }
131};
设置kSamplesPerPixel = 1,kMaxDepth = 5渲染出来的图为
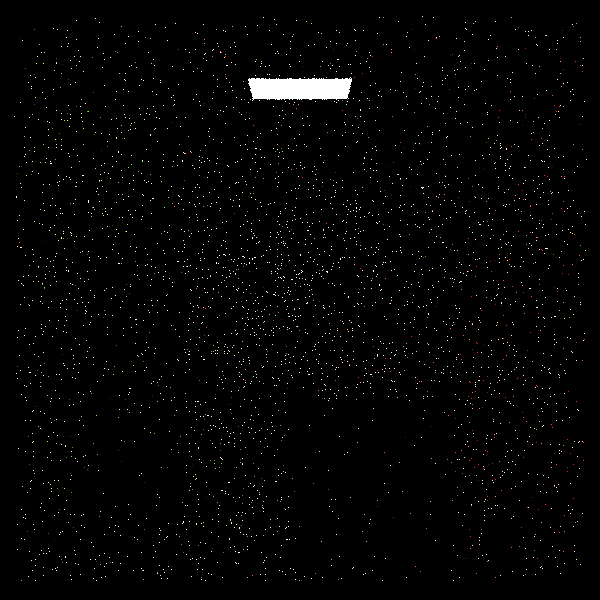 设置
设置kSamplesPerPixel = 16,kMaxDepth = 30渲染出来的图为
 设置
设置kSamplesPerPixel = 256,kMaxDepth = 64渲染出来的图为
结语
因为你是被CGLab选中的人所以你在实现渲染器的过程中应该感觉非常轻松,并且热爱上了计算机图形学,如果实现起来很困难说明你的资质还不足以加入CGLab,那么可以选则查看这个repoRe0-PathTracing,这个仓库中的代码可能与教程中有一点点不同,不过总体上都是相同的,如果你选择了查看这个仓库,你会自动获得网络,并且你将失去进入CGLab的资格,同时你只需要提交一张渲染截图,就可以逃出这个黑室了。