延迟渲染(Deferred Rendering) 是一种专为高效处理海量光源而设计的渲染技术,旨在解决传统前向渲染(Forward Rendering) 在多光源场景下的性能瓶颈。在前向渲染中,每个物体在绘制时都必须遍历场景内的所有光源并逐一计算光照。这意味着,若场景中有 $n$ 个几何片段和 $m$ 个光源,计算复杂度将达到 $O(n \times m)$。当光源数量增加时,渲染开销会呈线性爆发式增长。
为了打破这种耦合,延迟渲染将渲染流程解构为两个核心阶段:
1. 几何处理阶段(Geometry Pass)
在该阶段,场景仅进行一次常规渲染,但不立即执行复杂的光照计算。取而代之的是,我们将物体的各项几何与材质属性——如 反射率(Albedo、法线(Normal)、金属度(Metalic)、粗糙度(Roughness)、自发光(Emissive)、 环境光遮蔽(AO) 等——提取出来。
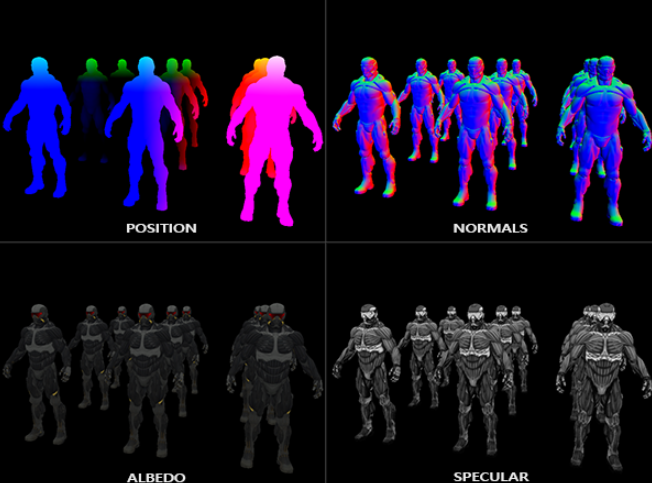
这些数据被渲染并存储在一系列高度集成的纹理缓冲区中,即 G-Buffer。由于 G-Buffer 只记录最终通过深度测试、对摄像机可见的片段信息,这为后续阶段剔除无效计算奠定了基础。下图展示了部分G-Buffer
2. 光照处理阶段(Lighting Pass)
在这一阶段,渲染器不再关注场景中有多少个复杂的模型几何体,而是直接遍历 G-Buffer 中的像素。通过读取每个像素点的几何与材质“档案”,结合场景中的光源信息进行统一的着色计算。
此时,计算复杂度由原来的“物体数量 $\times$ 光源数量”优化为屏幕像素数量。这种将几何处理与光照计算分离的设计,使得在场景中实时渲染成百上千个光源成为可能。
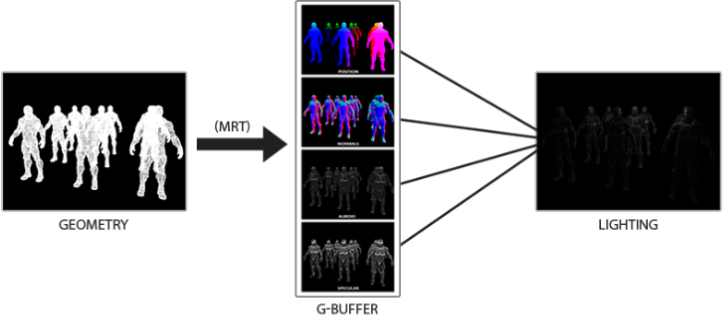
下面这幅图片很好地展示了延迟着色法的整个过程:

OpenGL 实现
由于G-Buffer是由多个纹理组成的,所以我们需要使用多渲染目标(Multiple Render Targets)来在一个阶段(Pass)之内渲染多个颜色缓冲
 1void AdvanceLightingState::CreateGBuffer(int width, int height)
 2{
 3    resources_.g_buffer_width = width;
 4    resources_.g_buffer_height = height;
 5
 6    glCreateFramebuffers(1, &resources_.g_buffer_fbo);
 7
 8    glCreateTextures(GL_TEXTURE_2D, 1, &resources_.g_position_texture);
 9    glTextureStorage2D(resources_.g_position_texture, 1, GL_RGBA16F, width, height);
10    glTextureParameteri(resources_.g_position_texture, GL_TEXTURE_MIN_FILTER, GL_NEAREST);
11    glTextureParameteri(resources_.g_position_texture, GL_TEXTURE_MAG_FILTER, GL_NEAREST);
12    glTextureParameteri(resources_.g_position_texture, GL_TEXTURE_WRAP_S, GL_CLAMP_TO_EDGE);
13    glTextureParameteri(resources_.g_position_texture, GL_TEXTURE_WRAP_T, GL_CLAMP_TO_EDGE);
14    glNamedFramebufferTexture(
15        resources_.g_buffer_fbo, GL_COLOR_ATTACHMENT0, resources_.g_position_texture, 0);// 将g_position_texture绑定到g_buffer_fbo的GL_COLOR_ATTACHMENT0纹理槽
16
17    glCreateTextures(GL_TEXTURE_2D, 1, &resources_.g_normal_texture);
18    glTextureStorage2D(resources_.g_normal_texture, 1, GL_RGBA16F, width, height);
19    glTextureParameteri(resources_.g_normal_texture, GL_TEXTURE_MIN_FILTER, GL_NEAREST);
20    glTextureParameteri(resources_.g_normal_texture, GL_TEXTURE_MAG_FILTER, GL_NEAREST);
21    glTextureParameteri(resources_.g_normal_texture, GL_TEXTURE_WRAP_S, GL_CLAMP_TO_EDGE);
22    glTextureParameteri(resources_.g_normal_texture, GL_TEXTURE_WRAP_T, GL_CLAMP_TO_EDGE);
23    glNamedFramebufferTexture(
24        resources_.g_buffer_fbo, GL_COLOR_ATTACHMENT1, resources_.g_normal_texture, 0); // 将法向量纹理绑定到g_buffer_fbo的COLOR_ATTACHMENT1纹理槽
25
26    glCreateTextures(GL_TEXTURE_2D, 1, &resources_.g_albedo_spec_texture);
27    glTextureStorage2D(resources_.g_albedo_spec_texture, 1, GL_RGBA8, width, height);
28    glTextureParameteri(resources_.g_albedo_spec_texture, GL_TEXTURE_MIN_FILTER, GL_NEAREST);
29    glTextureParameteri(resources_.g_albedo_spec_texture, GL_TEXTURE_MAG_FILTER, GL_NEAREST);
30    glTextureParameteri(resources_.g_albedo_spec_texture, GL_TEXTURE_WRAP_S, GL_CLAMP_TO_EDGE);
31    glTextureParameteri(resources_.g_albedo_spec_texture, GL_TEXTURE_WRAP_T, GL_CLAMP_TO_EDGE);
32    glNamedFramebufferTexture(
33        resources_.g_buffer_fbo, GL_COLOR_ATTACHMENT2, resources_.g_albedo_spec_texture, 0); // 将反射率和高光纹理绑定到g_buffer_fbo的GL_COLOR_ATTACHMENT2纹理槽
34
35    glCreateRenderbuffers(1, &resources_.g_depth_rbo);
36    glNamedRenderbufferStorage(resources_.g_depth_rbo, GL_DEPTH_COMPONENT24, width, height);
37    glNamedFramebufferRenderbuffer(
38        resources_.g_buffer_fbo, GL_DEPTH_ATTACHMENT, GL_RENDERBUFFER, resources_.g_depth_rbo);
39
40    GLenum attachments[3] = {GL_COLOR_ATTACHMENT0, GL_COLOR_ATTACHMENT1, GL_COLOR_ATTACHMENT2};
41    glNamedFramebufferDrawBuffers(resources_.g_buffer_fbo, 3, attachments); //out 0 = GL_COLOR_ATTACHMENT0 , out  1 = GL_COLOR_ATTACHMENT1, out  2 = GL_COLOR_ATTACHMENT2
42}
在 Fragment Shader 中,我们需要将不同的数据输出到对应的 layout(location = n) 中。
 1#version 460 core
 2
 3layout(location = 0) in vec3 a_Position;
 4layout(location = 1) in vec3 a_Normal;
 5layout(location = 2) in vec2 a_TexCoord;
 6
 7uniform mat4 u_model;
 8uniform mat4 u_view;
 9uniform mat4 u_projection;
10
11out vec3 v_FragPos;
12out vec3 v_Normal;
13out vec2 v_TexCoord;
14
15void main()
16{
17    vec4 world_pos = u_model * vec4(a_Position, 1.0);
18    v_FragPos = world_pos.xyz;
19    v_Normal = mat3(transpose(inverse(u_model))) * a_Normal;
20    v_TexCoord = a_TexCoord;
21
22    gl_Position = u_projection * u_view * world_pos;
23}
 1#version 460 core
 2
 3in vec3 v_FragPos;
 4in vec3 v_Normal;
 5in vec2 v_TexCoord;
 6
 7layout(location = 0) out vec4 g_Position; // 输出到0号纹理槽
 8layout(location = 1) out vec4 g_Normal; //  输出到1号纹理槽
 9layout(location = 2) out vec4 g_AlbedoSpec; //  输出到2号纹理槽
10
11uniform sampler2D u_AlbedoTexture;
12
13void main()
14{
15    g_Position = vec4(v_FragPos, 1.0);
16    g_Normal = vec4(normalize(v_Normal) * 0.5 + 0.5, 1.0);
17    g_AlbedoSpec.rgb = texture(u_AlbedoTexture, v_TexCoord).rgb;
18    g_AlbedoSpec.a = 1.0;
19}
G-Buffer Pass 就结束了接下来是光照处理 Pass 在光照阶段,我们渲染一个全屏四边形(Screen-filling Quad),并从 G-Buffer 纹理中重构光照所需的所有变量。
1glBindTextureUnit(0, resources_.g_position_texture);
2glUniform1i(resources_.lighting_shader->Uniform("u_GPosition"), 0);
3glBindTextureUnit(1, resources_.g_normal_texture);
4glUniform1i(resources_.lighting_shader->Uniform("u_GNormal"), 1);
5glBindTextureUnit(2, resources_.g_albedo_spec_texture);
6glUniform1i(resources_.lighting_shader->Uniform("u_GAlbedoSpec"), 2);
7glBindTextureUnit(3, resources_.depth_map_texture);
8glUniform1i(resources_.lighting_shader->Uniform("u_ShadowMap"), 3);
使用G-Buffer中的数据来获取光照所需的信息
 1uniform sampler2D u_GPosition;
 2uniform sampler2D u_GNormal;
 3uniform sampler2D u_GAlbedoSpec;
 4uniform sampler2D u_ShadowMap;
 5...
 6vec3 frag_pos = texture(u_GPosition, v_TexCoord).xyz;
 7vec4 albedo_spec = texture(u_GAlbedoSpec, v_TexCoord);
 8if (albedo_spec.a <= 0.001) {
 9    FragColor = vec4(0.0, 0.0, 0.0, 1.0);
10    BrightColor = vec4(0.0, 0.0, 0.0, 1.0);
11    return;
12}
13vec3 normal = normalize(texture(u_GNormal, v_TexCoord).xyz * 2.0 - 1.0);
14vec3 albedo = albedo_spec.rgb;
15float specular_mask = albedo_spec.a;
16vec3 view_dir = normalize(u_ViewPos - frag_pos);
总结
延迟渲染是现代游戏引擎的基石。但它对处理半透明物体不太友好需要结合前向渲染实现混合渲染,但其在处理复杂动态光照场景时的性能优势是无可替代的。